How to Automate Employee Onboarding and Software Access - no code required

When a new employee is hired, a fast and efficient onboarding process is key to get them started as fast as possible. There’s not much someone can do if they’re waiting around without being able to log into your company’s key software, and automating the process can go a long way in making sure no important access is left behind.
We’ll teach you how to get automatic Slack notifications as soon as a new employee is hired, get
automatic tasksfor every software necessary, and then communicate to the employee they’ve been granted access to everything they need.
Platforms used:
Time to build the tool ⏱:
- 4min 36sec on average.
5 steps to Automate Employee Onboarding and Software Access
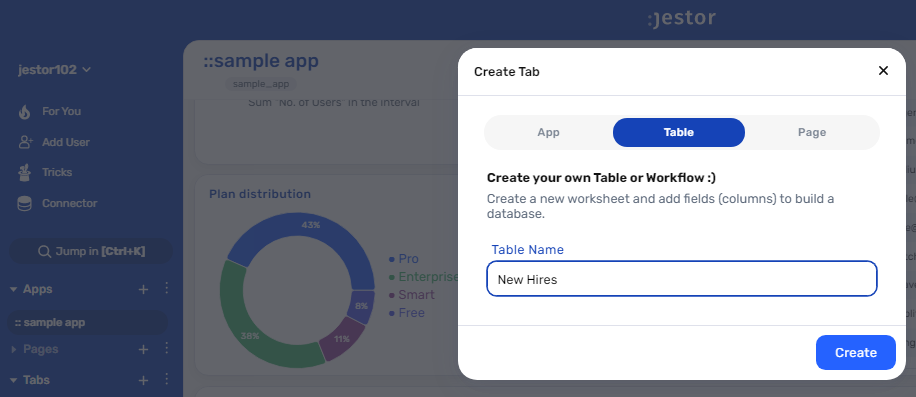
1. Create your New Hires workflow.
Create a
tablein Jestor, name it “New Hires”, and add all the necessary fields. The idea here is to get the information necessary to move the onboarding forward, usually the employee’s name, email and position. You can also create a
single selectfield for Status, such as New, In Progress, and Done, then click on “
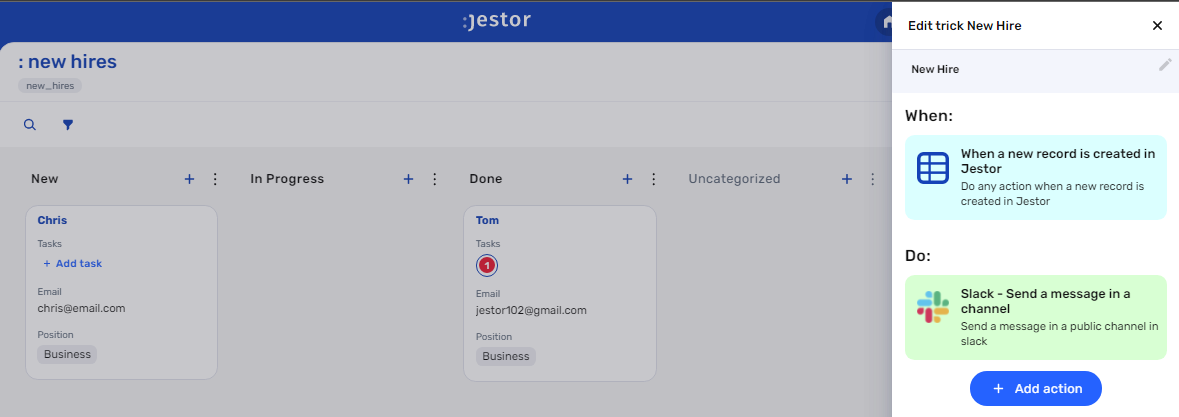
Flow” to activate a workflow view. Now, you have a visual representation of the process, and can basically drag the cards along as you work on them.

2. Set up a Slack alert.
Now, as the
trigger, choose “When a new record is created” and when a manager creates a new hire record, you want to get started as soon as possible. There’s nothing better for that than real time notifications and, in this case, we’ll go with Slack messages.
Choose the “
Slack - Send a message in a channel” action. Connect your Slack account and choose the channel the alert will be sent to. Now, type in the message that you want to receive by using a mix of fixed text and dynamic information.
We’ll go with: “New hire: {{name}} | Action needed: create accesses”

3. Create automatic tasks.
Now, let’s set up automatic tasks for the necessary accesses. Open the
trickspanel (by clicking on the bunny in the hat icon) and create a new trick. Give it a name and description so you can later identify this trick should you need to edit or deactivate it.
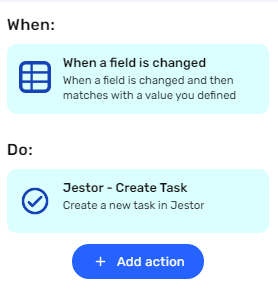
Now, as the trigger for this automation, select When a field is changed. What we’ll go with here is that, when you move the new hire card to “In Progress”, you’ll receive tasks in
Jestorautomatically. Select the “New Hires” table, choose the Status
field, and type in In Progress.
Choose the
Jestor - Create Task'' action. For the task information, we’ll go with:
- Task description: we’ll create a short description that basically says what software the new employee needs access to. Something like: “Create GitHub access”.
- Owner: for the owner of the task, you can get that information dynamically or, in this case, set up manually for yourself.
- Table: choose the “New Hires” table. That way, the task is associated with the onboarding workflow.
- Record: choose the id of the new hire card (it’ll look something like “id”). This way, the automatic task will be associated with the specific card you drag to In Progress!
Repeat this for every necessary access. For example, you can add a new “Jestor - Create Task” action for a Slack access. Once you’re done, save this trick.

4. Create an automatic email.
We’ll now create an automation to notify the new employee everything’s set! Create a new
trick, setting the trigger as “When a field is changed” as well. This time, go with Status equals Done.
Choose the “Gmail - Send email” action. Connect your Google account and set up the email by filling in all the required fields. You can do so by writing in things directly, by using information from Jestor, or a mix of both. In this case, we’ll go with:
- To: we’ll send the email to the employee, using the email address in the workflow record. Depending on how you named the field in your workflow, it will probably look something like {{email}}.
- Subject: we’ll write “All set: we’ve granted access to everything you need!”
- Message: we’ll make sure the message is dynamic by using something like: “Hi {{name}}! You should have received every necessary access for you to get started. Please let us know if you need any help.”

5. Test your automation to make sure everything is working as planned.
Create a new hire entry with your own information, then drag this card to “In Progress”. If you’ve set up everything right, the following things should have happened:
- You should have received a Slack message notifying you a new employee must be onboarded.
- You should have received Jestor tasks guiding you through which accesses you should grant the new employee.
Move the card to “Done”. You should now have received an email as set up in step four, notifying you you’re good to go!
A proper onboarding process will make sure new hires can hit the ground running! There’s nothing better for someone to feel like part of the team than immediately being integrated into the daily routines and not having to worry about asking around for help when they need to do basic tasks. Make teams work better with
Jestor!
What's Jestor?
Jestor is a no-code tool to build scalable internal systems, fast. You can create apps, automations, workflows and databases tailor-made for your company. Unlimited users, records, apps and automations.
Try it for free here?

