Sending automatic Calendar invites and Whatsapp messages to applicants – no code required

Hiring new team members is an exciting, but very time consuming process. Not only do you have to synchronize applicants and interviewers’ calendars, but be in touch with every candidate, juggling a lot of different contacts. Thankfully, you can automate standard messages, which can take a load of bureaucratic work off your shoulders!
We’ll teach you how to send automatic WhatsApp messages and Calendar invites to help you focus less on manual tasks and more on getting the best talent out there.
Platforms used:
Time to build the tool ⏱:
- 4min 35sec on average.
5 Steps to Send automatic Calendar invites and Whatsapp messages to applicants
1. Create your recruiting pipeline.
Create a table in Jestor, name it “Applicants”, and add all the fields you’ll need for the process. For example, you’ll usually need an applicant’s name, email address, interview date, and even an attachment field for their resumé. Create a single select field for Stage, such as New and Interview, then click on “Flow” to activate a workflow view. Now, you have a visual representation of the process, and can basically drag the cards along as you work on them.

2. Create your automation.
Open the tricks panel (by clicking on the bunny in the hat icon) and create a new trick. Give it a name and description so you can later identify this trick should you need to edit or deactivate it.
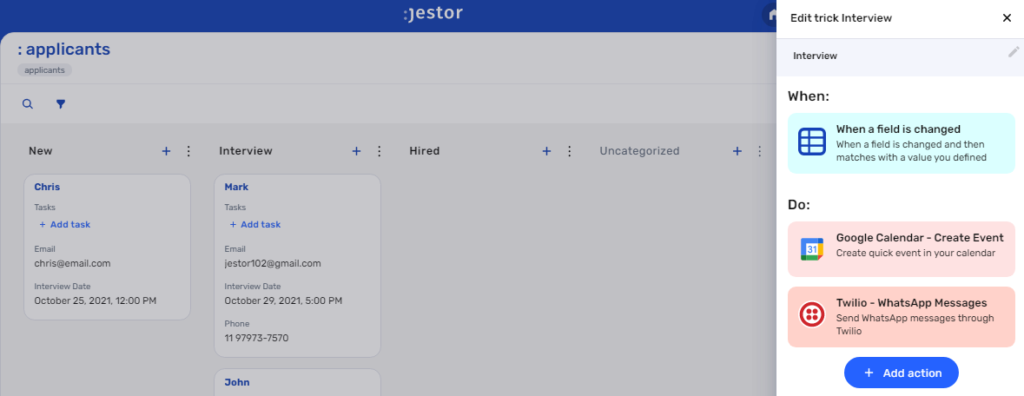
In this automation, we’ll send an invite and a Whatsapp message when an applicant is moved to “Interview”. So, as the trigger for this automation, select When a field is changed, choose the “Applicants” table, as a condition choose the field Stage, then write “Interview”.

3. Integrate the Calendar to your pipeline.
Now, choose the “Google Calendar – Create Event” action. Connect your Google Calendar account and fill in the required information. You can do so by writing in things directly, by using information from Jestor, or a mix of both. In this case, we’ll go with:
- To: we’ll click on the applicant’s email {email}, so this changes dynamically.
- Start date: we’ll choose the “Interview date” field. Do note that we could also use date modifiers to change this date, if I wanted to take into account time zones, for example.
Now, as soon as I pass an applicant to the Interview stage, they’ll receive the invite.
4. Send an automatic WhatsApp message.
Choose the “Twilio – WhatsApp Messages” action. Connect your Twilio account and set up the message by filling in all the required fields. You can do so by writing in things directly, by using information from Jestor, or a mix of both. In this case, we’ll go with:
- From: this field should pull information automatically from Twilio. Choose one of your available phone numbers.
- To: choose the field with the client’s phone number, which should look something like {{phone}}.
- Message: we’ll write a dynamic message for the candidate: “Hi {{name}}! Just sent you an invite for the interview. Let me know if you can’t make it.
5. Test your automation to make sure everything is working as planned.
Create a new applicant with your own information. Now, add in a date and time for the interview, and move the card to the “Interview” stage. If you’ve set up everything right, two things should’ve happened:
- You should have received an invite in Google Calendar.
- You should have received a WhatsApp message.
Now, not only is the invite sent automatically, but you’ve provided a quick way for the applicant to reply. If they have any questions or can’t make it to the interview, all they have to do is answer your message. This way, you automate standard steps of the process to save time, but can step in immediately to help out when needed ?♂️
What’s Jestor?
Jestor is a no-code tool to build scalable internal systems, fast. You can create apps, automations, workflows and databases tailor-made for your company. Unlimited users, records, apps and automations. Try it for free here ?

