Adding a new client to Mailchimp and sending a greeting email automatically – no code required

If you’re using Jestor as a sales workflow, there’s a lot more you can do with it than just moving cards in a kanban view. There’s a whole lot of automations and integrations that can ensure not only this process goes smoothly, but that it feeds into other processes as well. One of the possibilities is to automatically upload a new client to your Mailchimp list, so they receive all your emails about updates and other products.
We’ll teach you how to automatically upload a subscriber to Mailchimp and send a greeting email as soon as a new deal is closed.
Platforms used:
Time to build the tool ⏱:
- 4min 42sec on average.
Costs to test ?:
- Gmail ( $0 ) + Mailchimp ($0 1 audience and 1 automation) + Jestor ($0 under 200 actions/mo) = $0.00*
*costs may vary according to different providers pricing changes.
5 Steps to Add a new client to Mailchimp and sending a greeting email automatically
1. Create your sales workflow.
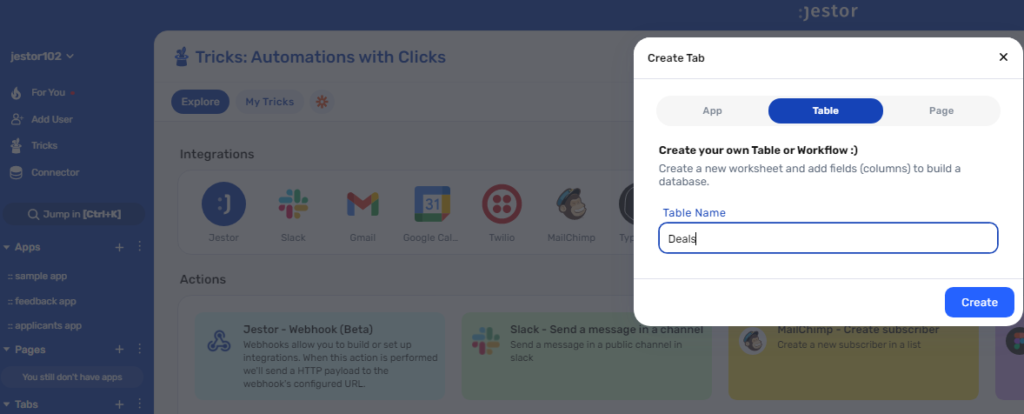
Create a table in Jestor, name it “Deals”, and add all the fields you’ll need for the process. For example, you’ll usually need a client’s name, email address, deal amount. Create a single select field for Status, such as New, Won and Lost, then click on “Flow” to activate a workflow view. Now, you have a visual representation of the process, and can basically drag the cards along as you work on them.

2. Create your automation.
Open the tricks panel (by clicking on the bunny in the hat icon) and create a new trick. Give it a name and description so you can later identify this trick should you need to edit or deactivate it.
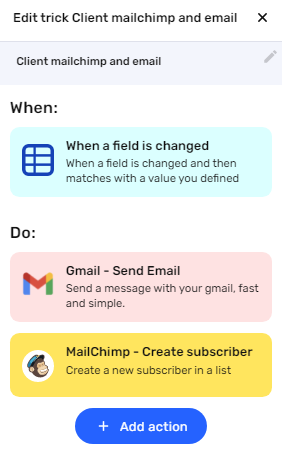
In this automation, we’ll send an email as soon as a client is moved to “Won”. So, as the trigger for this automation, select When a field is changed, choose the “Deals” table, as a condition choose the field Status, then write “Won”.

3. Send an automatic email.
Choose the “Gmail – Send email” action. Connect your Google account and set up the email by filling in all the required fields. You can do so by writing in things directly, by using information from Jestor, or a mix of both. In this case, we’ll go with:
- To: we’ll send the email to the client, using the email address in the receivable record. Depending on how you named the field in your workflow, it will probably look something like {{name}}.
- Subject: we’ll write “Looking forward to working together!”
- Message: we’ll make sure the message is dynamic by using something like: “Hi {{name}}! Thanks for choosing our services! Just wanted to give you a heads up that from now on you will also be receiving a lot of cool updates from us ;)”
4. Upload a contact to Mailchimp.
Choose the “Mailchimp – Create subscriber” action. Connect your Mailchimp account and choose the list you wish to upload the subscriber to. Then, match the information from Jestor to the available fields in Mailchimp.
Tip: You may repeat this step for more than one list, so you upload the same contact to different mailing lists. That way, even if they unsubscribe from the “Promotional” list, they’ll still receive emails from the “Updates” list.
5. Test your automation to make sure everything is working as planned.
Create a new deal with your own information. Now, move the card to the “Won” status. If you’ve set up everything right, two things should’ve happened:
- You should have received an email as set up in step three.
- Your contact information should have been uploaded to your Mailchimp list.
In just few steps, you’re making sure that every new client is always updated on cool features, promotions or any kind of news you wish to share with your base. Regular mailing lists are a great way not only to engage with you clients, but to create even more business opportunities with them ✉️
What’s Jestor?
Jestor is a no-code tool to build scalable internal systems, fast. You can create apps, automations, workflows and databases tailor-made for your company. Unlimited users, records, apps and automations. Try it for free here ?

